Ride with more control.
Practical coaching breakdowns for riders who want to understand how we teach correct movement, read terrain and build skills that hold up when the trail gets more demanding.
Choose your skill.
Each article combines a clear movement focus with practical drills you can apply on suitable, familiar terrain.
Ride steeps with confidence.
Learn precicely how do you stay centered as the graient changes, why some riders exit steep chutes with immense control and some don't The answer is in one of the paragraphs.
Read the steeps guideKeep pace through steep, rough terrain.
Build range of movement, braking awareness and pressure control to stay balanced, stable and in control as the terrain gets faster and more demanding.
Read the steep and rough terrain guideCorner smarter.
We've long moved on from dropping the outside foot, here we use it as a lever to adjust the rate of angulation and rotation to maximise traction.
Read the cornering guideRide bigger jumps.
Understand the zone of compression, build a stable approach and learn the difference between absorbing a take-off and extending through take offs and why that's cruicial when riding taller, steeper take offs.
Read the jumps guideUnderstand drops.
Learn how pressure control and timing play a crucial role in drops. Understand the true physics behind the timing.
Read the drops guideUse the guides on features you are comfortable riding, build the movement gradually and choose appropriate terrain as you progress.
Keep pace and control through steep, rough terrain.
Range of movement, braking and terrain awareness for riders looking to stay balanced, stable and in control at speed.
This article is intended for racers, competitors or just about someone that feels accomplished through progress, in this case by riding fast through the steep and rough terrain.
When riding steep and rough terrain at speed, the goal is not simply to survive the feature but to maintain pace while staying balanced, stable and in control. Riders often focus on speed or line choice alone, yet the greatest gains frequently come from how effectively they adapt their body position and movements to changing terrain. It is safe to highlight that stability and balance will play a crucial role throughout and most importantly, how this stability and balance is maintained through the range of movement as terrain gradient and difficulty changes.
Achieving stability and balance via range of movement
On the approach to steeper terrain on the flatter gradient, staying taller and stacked plays a great role in maintaining stability, bracing power etc although as the gradient gets steeper we need to trade our stacked stable position for a bit more manoeuvrability for greater overall control.
On moderate gradients, a taller and more stacked position provides stability, support, braking power and an efficient platform from which to react. I like to call this the “default” position which allows riders to remain strong through their legs, hips over feet and stacked with relatively straight legs. However, as the terrain steepens, riders must deliberately move lower and closer to the bike to increase manoeuvrability while maintaining hips over feet.
Active hip hinge
The foundation of this movement is an active hip hinge. Rather than leaning back and pulling on the handlebars, the rider hinges through the hips, bringing the torso closer to the top tube of the frame while keeping weight centred over the pedals. Keeping the back of your hips/bums pointed up the sky provides a solid anchor in this position. The rider in this instance moves lower and closer to the bike so the bike may be able to move independently beneath the rider while preserving traction and control through rough terrain as needed.
Rider Takeaway: Stay tall and stacked where the terrain allows support. Move lower and closer to the bike as the terrain steepens so the bike can move beneath you while your weight remains centred over the pedals.
Skills at play: Stability and balance via range of movement.
Return tall through compression
When the terrain begins to flatten out again this is called a compression - riding through this the rider is bound to experience G-force. In this instance, the rider must actively return to the taller position by first pressing and extending through the arms and then through the legs. This coordinated movement allows the rider to push into the compression created by the transition, brace against the G-force and carry speed efficiently into the next section of trail.
Timing this movement correctly is crucial as returning tall too early can cause the rider to miss the timing of the compression and hence as a result of the G-force, the rider may be pitched forward. On the other hand staying low for too long can limit the amount of strength delivered and may again cause the rider to sink into the bike due to the pressure.
Rider Takeaway: Return taller and stronger when the terrain gives you support. Time the movement with the compression so you can manage pressure, stay stable and carry speed.
Skills at play: Pressure control and timing.
Using braking zones to maintain pace and control
Skills at play: Controls (brakes), terrain awareness, pressure control and timing.
Another important skill for maintaining pace and control through steep and rough terrain is understanding braking zones. A braking zone is an area of trail where braking is most effective due to increased traction and support from the ground. A simple example is a trail that transitions from a steep gradient into a flatter section. If a rider applies consistent brake pressure while descending, they will often notice the bike slows most effectively as it reaches the point where the trail begins to flatten.
This transition creates what we call a compression as explained in the parts above.
Insight 1
As the bike moves down a steep gradient, the bike feels lighter, which limits the available traction for braking. Although, when the trail transitions into a flatter section, the bike experiences increased load as both rider and bike are pushed into the terrain. The suspension compresses, the tyres gain more grip, and braking becomes significantly more effective and for this very reason, compressions often become natural braking zones.
Insight 2
Rather than braking heavily in the steepest sections where traction is limited, skilled riders identify areas of increased support and perform the majority of their speed control there. This allows them to maintain better traction, remain more stable and carry greater pace through technical terrain.
Expert riders constantly scan the trail for these opportunities. Compressions, supportive terrain, berms and flatter sections can all serve as effective braking zones. By matching braking effort to areas where the trail provides maximum support you can reduce unnecessary loss of traction, maintain better balance and preserve momentum as the terrain develops.
Rider Takeaway: Look for where the trail gives support. Brake more where grip is available, rather than relying on heavy braking in the steepest or loosest parts of the trail.
Conclusion
I would also like to conclude this article by highlighting that while compressions often make the bike feel heavier and increase load through the tyres and suspension, they are not solely areas for braking.
They can also be powerful opportunities for acceleration. A useful analogy is a pump track. Imagine the valley between two rollers. The valley, or compression, is where riders generate speed by pushing into the terrain, while the rollers themselves are largely absorbed to preserve momentum until the next opportunity to generate speed.
The same principle applies when riding steep and rough terrain. As you enter a compression, the increased support from the ground creates greater traction and stability. This support can be used in different ways depending on the rider's objective.
- If speed reduction is required, the compression becomes an effective braking zone.
- If maintaining or increasing speed is the goal, the same compression can be used to add pressure into the terrain and create acceleration.
This demonstrates one of the most fascinating aspects of mountain biking: the interchangeability of outcomes from a single terrain feature. A compression can simultaneously provide traction, stability, braking support and opportunities for acceleration. The outcome is determined not by the terrain itself, but by how the rider chooses to interact with it.
Final takeaway: Ultimately, it is up to you as an expert rider to identify opportunities within the terrain. In this instance a compression is not only a place to brake. It can also be a place to generate speed, increase stability or maintain flow. Decide what outcome you want and use the terrain intentionally to achieve your desired outcome.
Treadmark MTB Skills - Jumps
What changes on bigger, steeper jumps?
The work happens well before the lip: build a stable platform, use the compression zone deliberately and choose whether to absorb or extend.
Taller and steeper take-offs can be intimidating and for good reason. When riders step up to bigger jumps, it is easy to focus on speed, pulling up on the handlebars, or trying to muscle the bike through a steeper lip.
Bigger jumps do not require more effort. They require a variation in technique around the zone of compression and the ability to use that zone to resist or make use of the forces the jump naturally creates.
This article deconstructs technique for larger jumps, especially those with steeper take-offs.
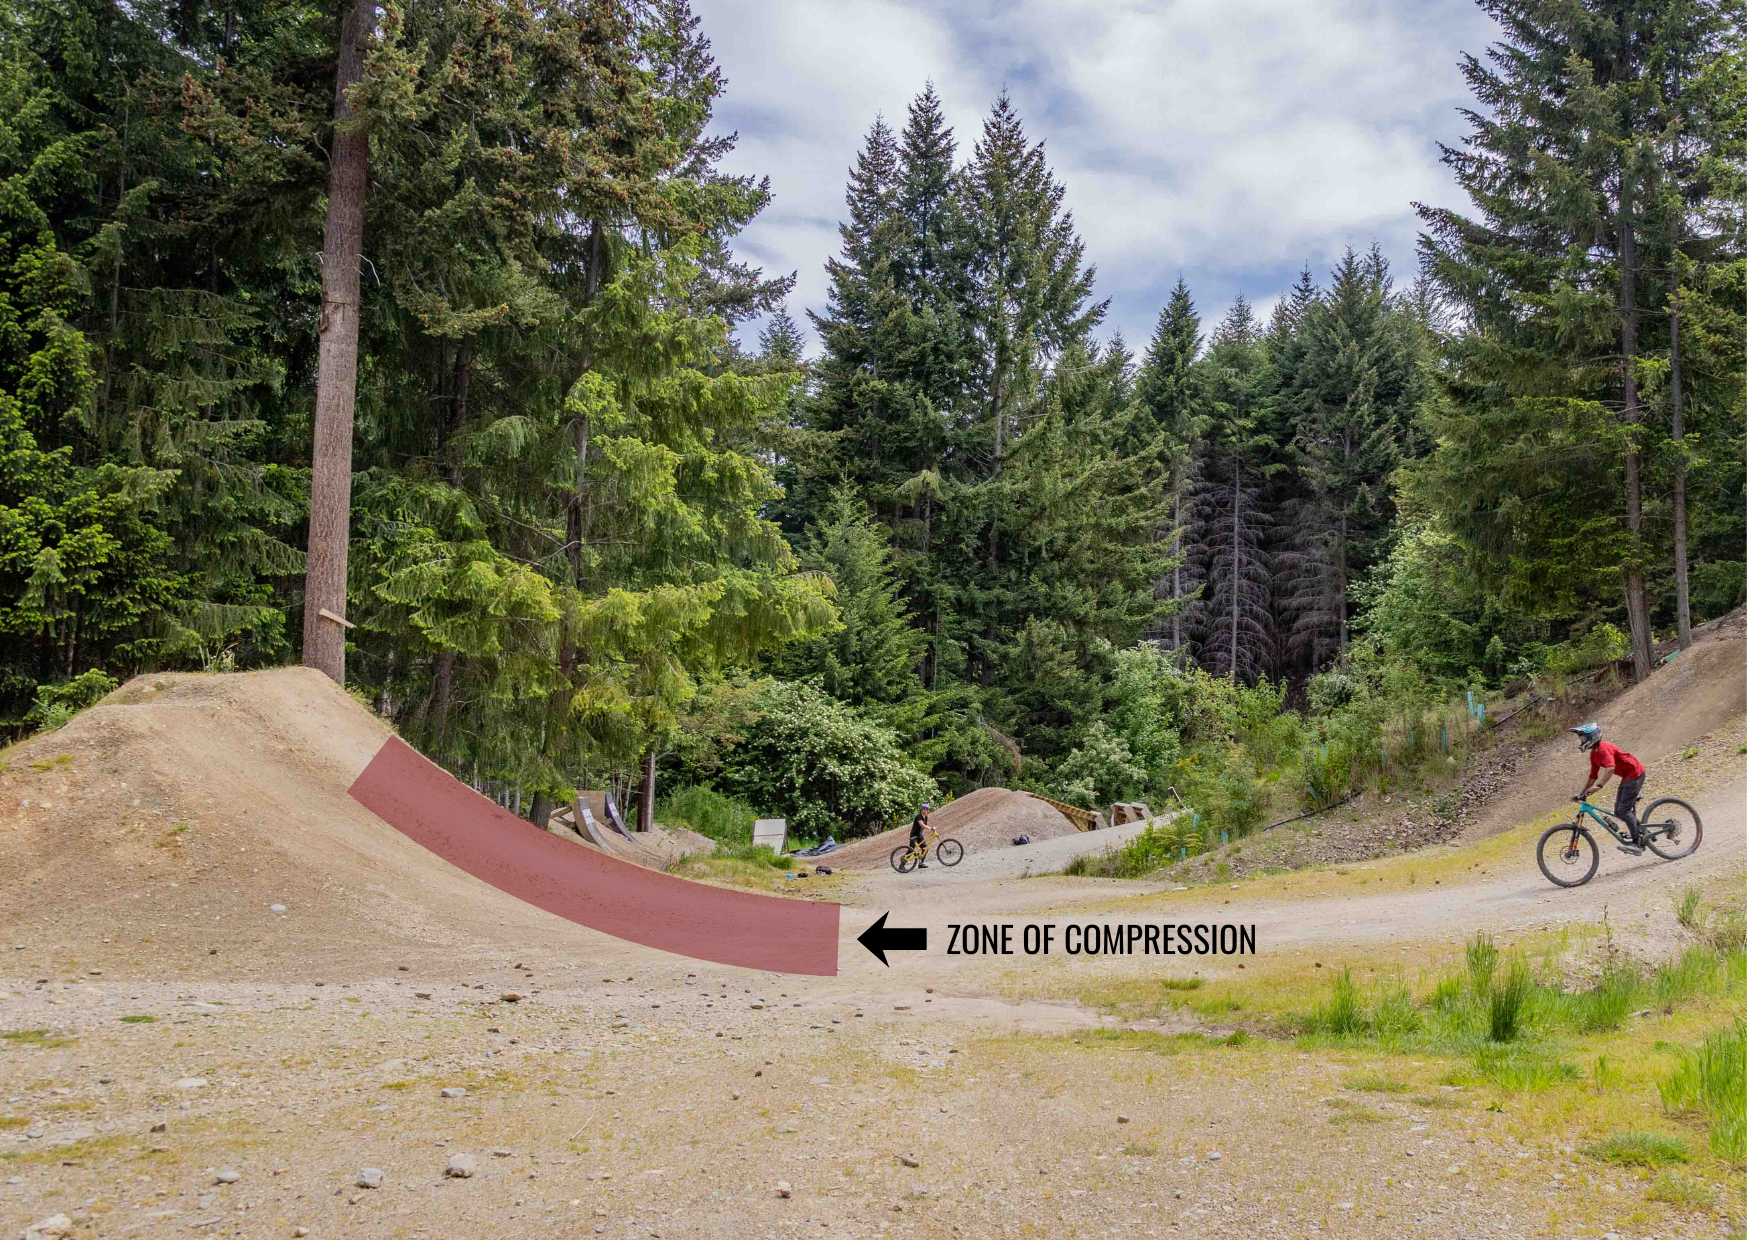
The zone of compression
The take-off has two parts: where you compress into the jump, and the lip where you leave the ground. Height, balance and clean airtime do not come from the top of the take-off alone; they begin in the zone of compression.
This zone starts on the flat ground before the ramp and continues past the halfway point of the take-off. It is where you build pressure, and how you build it determines how the bike feels in the air.
The approach
Body position is the fundamental base. Before the take-off, stand up and arrive as strong and centred as possible.
Approach tall and strong with your weight travelling through the feet. Keep your hips over your feet, legs straight but not hyperextended, and your pedals level with the heels slightly dropped.

Use your chin over the stem as a visual reference for being centred on the bike. As a feeling reference, the majority of your weight should travel through your feet and your hands should feel relatively light.
How stable is your neutral position?
- Can you balance in this position on flat ground?
- Does your weight move back and forth when you brake?
- Can you hold it with relative ease on easier trail?
If the first two are difficult, strengthen the position before tackling larger jumps. A stable approach is what lets a rider load the bike, build smooth pressure and remain balanced through take-off and airtime.
Absorb or extend?
Absorbing
Absorbing releases pressure earlier and lets the arms and legs soften as the bike rises. It can suit mellower jumps and lower trajectories.
Extending
Extending holds a deliberate press for longer, then lets the legs lengthen near the end of the lip. This helps resist the ramp and create predictable height.
Absorbing a jump
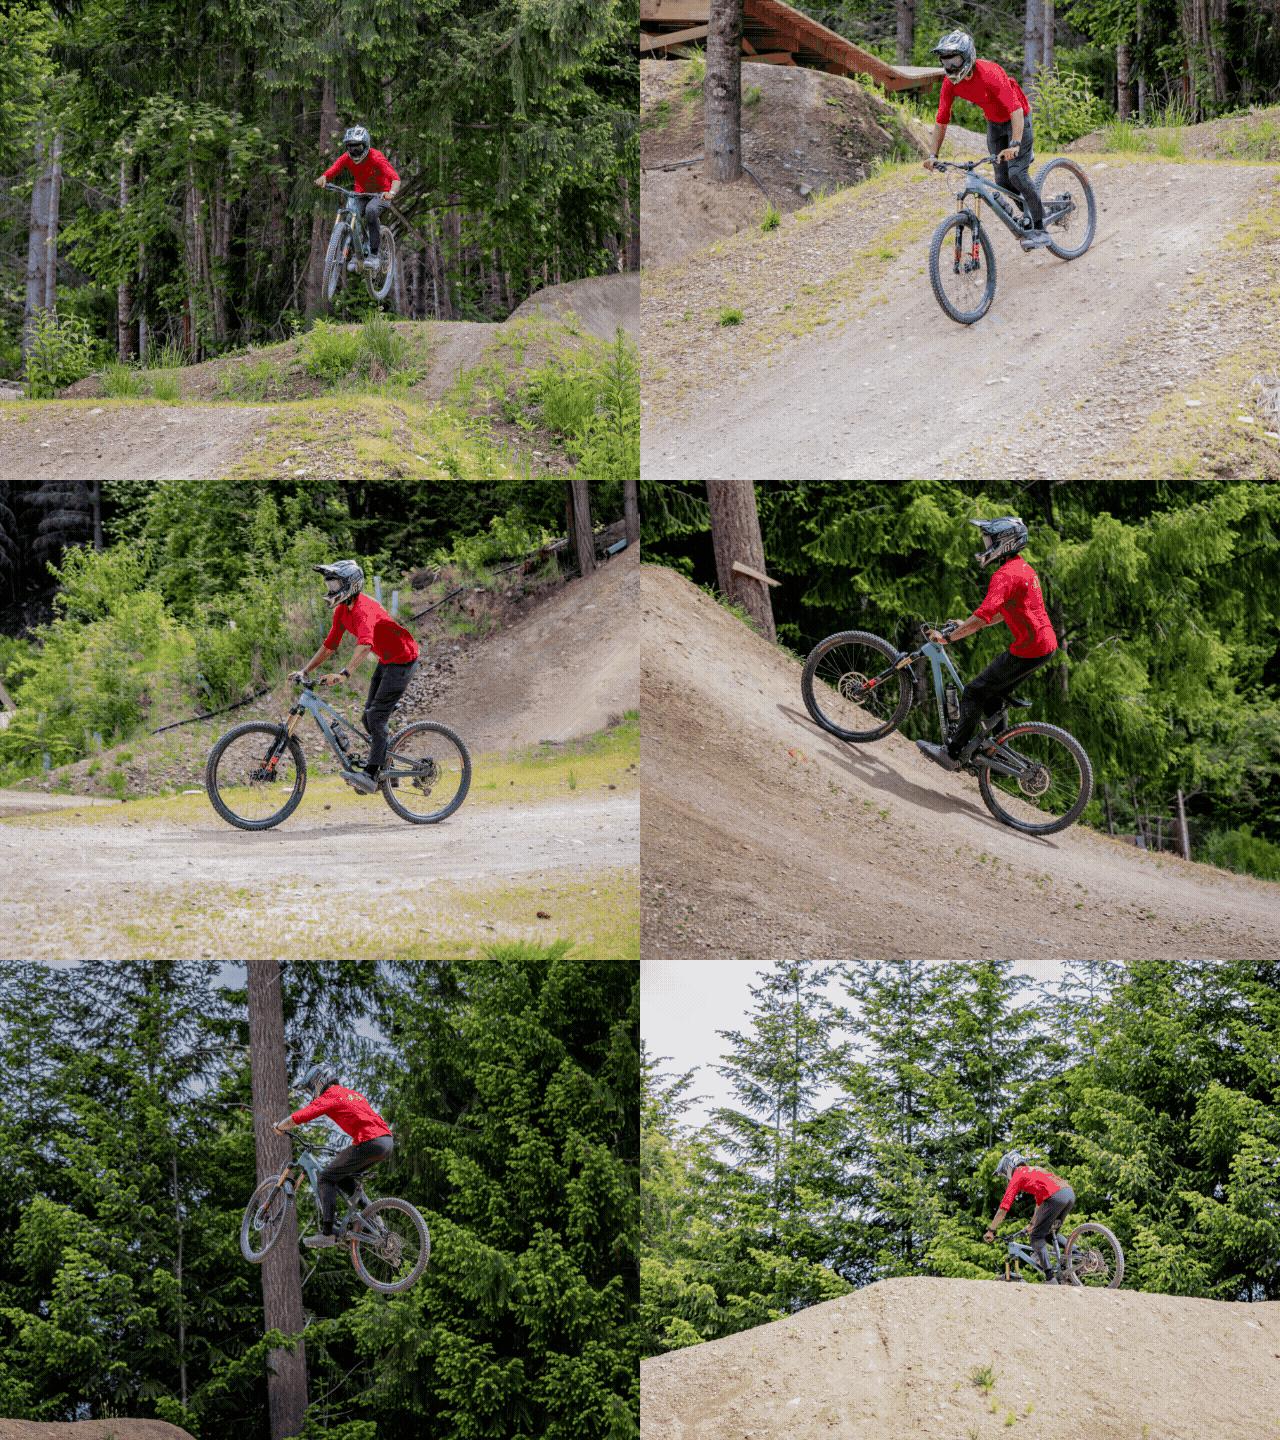
When choosing to absorb, the approach remains tall, strong and centred. Begin with a light press at the bottom of the take-off, then stand taller earlier, before the end of the compression zone.
Releasing pressure early means you do not use the entire compression zone. With more take-off still ahead, the remaining ramp pushes into your body instead. You intentionally soak up that pressure by bending the arms and legs.
- Bent elbows and knees in the air.
- A lower upward trajectory.
- A softened jump that uses less of the feature's available energy.
This can work well on many jumps and may be the safer choice in some situations. The important point is to recognise when you have absorbed the feature, rather than doing it accidentally.
Extending through the lip
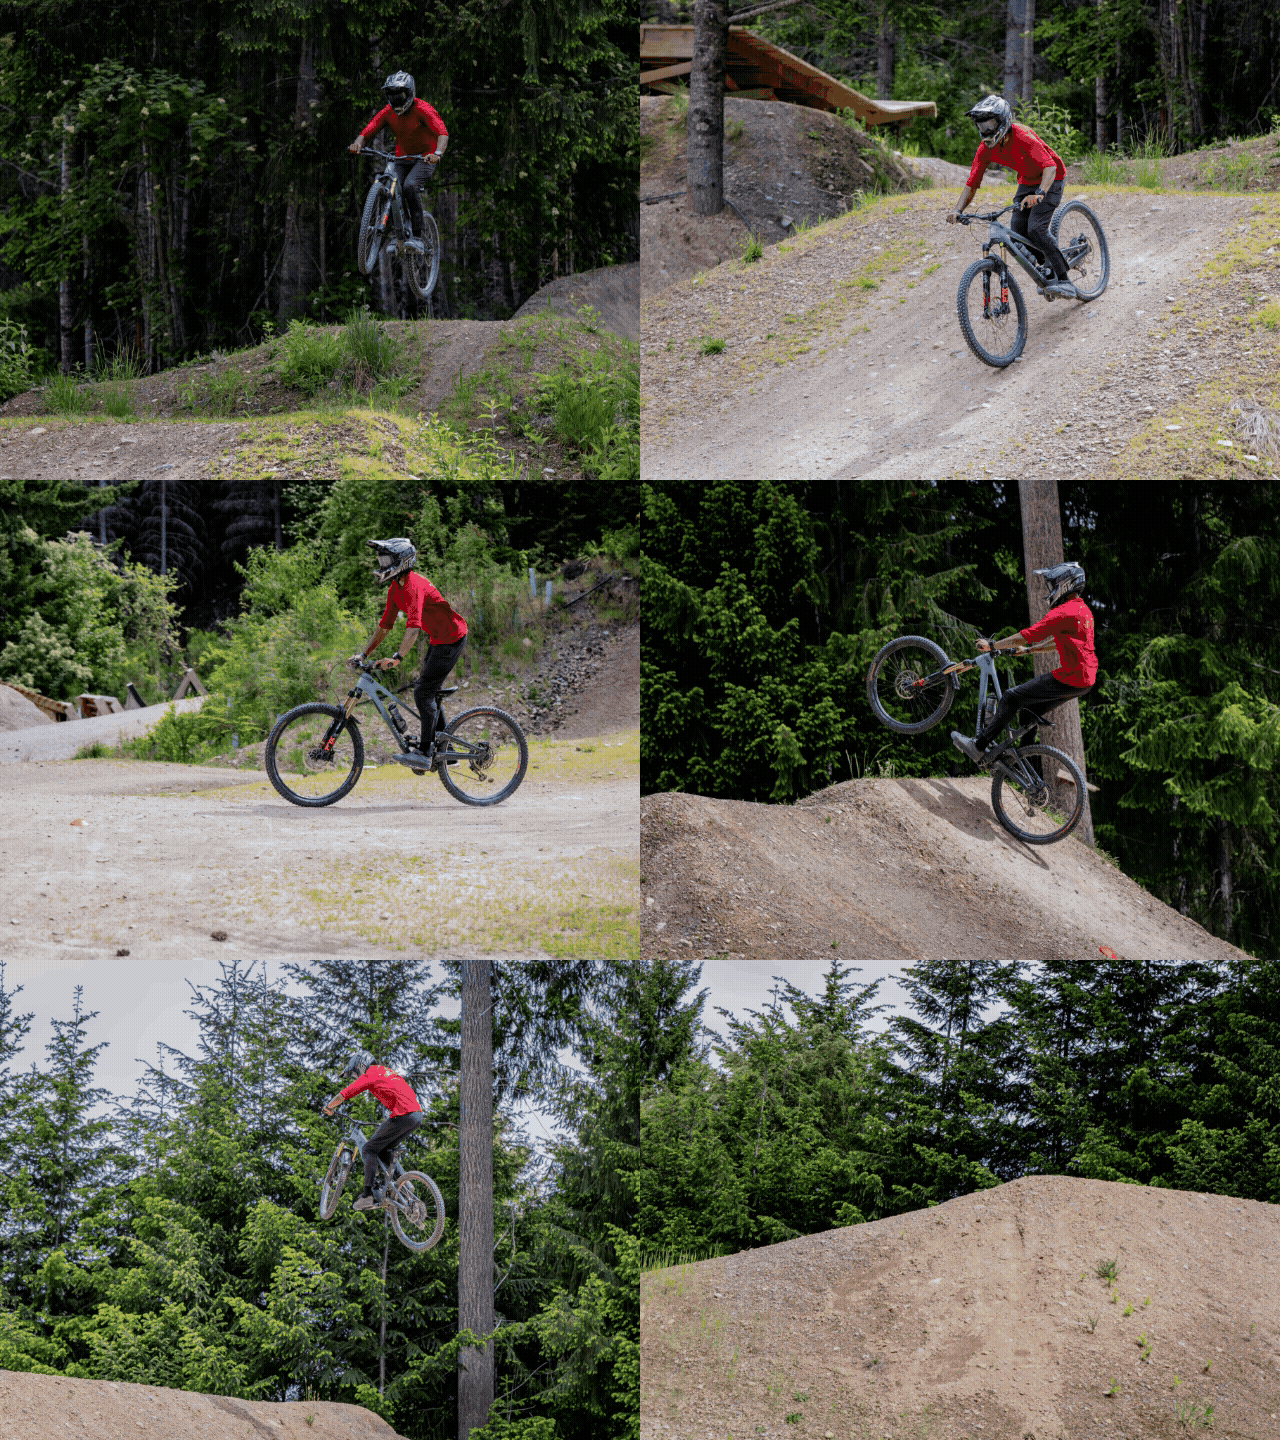
Extension is often useful on longer, steeper lips. It lets the rider remain centred, use the full compression zone and create more stable, predictable airtime.
- 01Enter stable
Stay tall, strong and centred as the wheels reach the start of the compression zone. A weak position is magnified as soon as you enter the jump.
- 02Press smoothly
Press evenly through the feet at the bottom of the take-off. Think smooth, consistent and controlled instead of pulling up on the handlebar.
- 03Hold the press
Maintain it through the compression zone, until just past halfway up the take-off. This creates pressure and helps resist the G-force of a steep ramp.
- 04Extend at the lip
Once the press has been held long enough, let the legs lengthen near the end of the take-off and carry that energy into the air.
Use the take-off intentionally.
Both skills matter. Learn to absorb when you need to soften the feature, and extend when you need to use more of its energy. Send us a jump video for a complimentary SportSense analysis.
Treadmark MTB Skills - Cornering
Drop the foot or stay level?
Outside foot position is a tool, not a rule. Learn how Tip and Twist helps you choose the right movement for the corner in front of you.
One of the most common mountain-bike cornering questions is whether to drop the outside foot. The answer is not always yes or no; it depends on the trail, speed, turn and the movement of the rest of the body.
Tip and Twist combines three connected elements. Foot position is one part of the puzzle, not the starting point.
Angulation
Tip the bike into the turn while the body stays centred.
Rotation
Twist the hips and torso toward the exit.
Inclination
Let bike and body lean together when the terrain calls for it.
Putting it to the test
A mellow approach, 90-degree turn, low traction and room to move provides a useful setting for comparing different pedal strategies.
Pedals level
Keeping the pedals level can feel stable, but it may leave less room for the bike to tip underneath the body. The carve can become limited as speed increases.
Full foot drop from the start
Dropping the outside foot before the bike has begun to lean can create initial grip, but it can also restrict angulation and push the rider wide of the exit.
Adaptive foot drop
Tip the bike first and rotate toward the exit. Let the outside foot drop only when it gives the bike room to lean. The result is a smoother, tighter and more stable corner.
The takeaway
Dropping the outside foot is not wrong. It should complement your Tip and Twist, rather than replace the movements that create traction and control.
Try this cornering drill
- 01
Ride a marked corner with your pedals level.
- 02
Ride it again with a full outside foot drop from the start.
- 03
Ride it using Tip and Twist, allowing the foot drop to happen naturally as you lean and rotate.
Film each attempt if you can. Timing is often easier to understand when you can compare the three runs.
How do I know if I dropped too much?
If the bike over-leans and drifts wide, the foot may have dropped too far or too early. Stay dynamic: drop with the turn, not before it.
Want to corner like a pro?
Join a Treadmark cornering session in Queenstown to build smoother transitions and more confidence in berms, flat corners and off-cambers.
Treadmark MTB Skills - Drops
The anatomy of drops.
A clean drop starts before the edge: build controlled pressure, release it at the right time and adapt your body to the feature.
Riding drops well is not just about speed, courage or going for it. The key is understanding why certain movements happen and how to use them to ride with more control, comfort and confidence.
Watch the video first, then use the notes below to understand the setup, pressure and release behind a smoother drop.
Compression and control
The zone of compression is the space before the lip where the body is doing some of its most important work. Pressing through the feet sends weight, through the core and hips, down through the bike and builds stored energy in the rider and bike together.
Without that setup, the front wheel can drop before the rear is ready to leave. The result can be a nose-heavy landing or an unpredictable take-off. Compression is an important tool, although it is always contextual - higher speed can change how much pressure a rider needs to create.
Timing the release
As you leave the compression zone, release the stored energy and allow the bike to become lighter underneath you. This gives you time and direction toward the landing rather than simply falling off the edge.
Set up
Identify the area before the lip where the feature supports a controlled press through the feet.
Build pressure
Load the bike smoothly through the compression zone while keeping your body balanced and centred.
Guide the bike
Release at the lip so the bike moves with you toward the landing, not away from you.
Steeper drop variation
Steeper gradients demand a more dynamic body position. Move lower and closer to the bike as you approach the edge, press more actively through the bike and use a controlled front-wheel lift to keep the bike level. This is not a yank or a bunny hop; it is a deliberate movement that matches the feature.
Build a smoother drop
- 01
Start on a drop or step-down where you can focus on the setup without needing extra speed or commitment.
- 02
Feel the press through your feet before the lip, then notice when the bike becomes lighter underneath you.
- 03
Progress only when your landing feels centred, controlled and repeatable.
What did we learn?
Pressing through the feet builds pressure with control. Releasing at the right time gives you space and direction toward the landing. Steeper gradients need body movement that is adapted to the feature itself. Do not skip the setup.
Want to learn these movements in person?
Train with Treadmark in Queenstown for step-by-step coaching that helps you approach every feature with more confidence.
Treadmark MTB Skills - Steeps
How to Ride Steep MTB Features | Mountain Bike Stability Tips from Ben Lomond Trails
Move from tall and powerful, to low and manoeuvrable, then return tall as the trail gives you support again.
This article covers the movement needed when riding steeper features. A rock roll provides a useful place to train body awareness, control and stability as terrain changes from flat, to steep, and back to flat again.
The goal is to develop dynamic movement on the bike while using sound judgement to adapt to gradient and traction. When this is working, you stay centred through your full range of movement and adapt to changing terrain with more precision and control.
Approaching the feature
Keep braking consistent throughout the feature so you maintain a speed you are comfortable with. As the gradient changes, use position to stay centred and in control.
The starting point is a tall, strong default position. Think of body position like the gear stick in a manual car: it is not fixed. You move it to match the terrain.
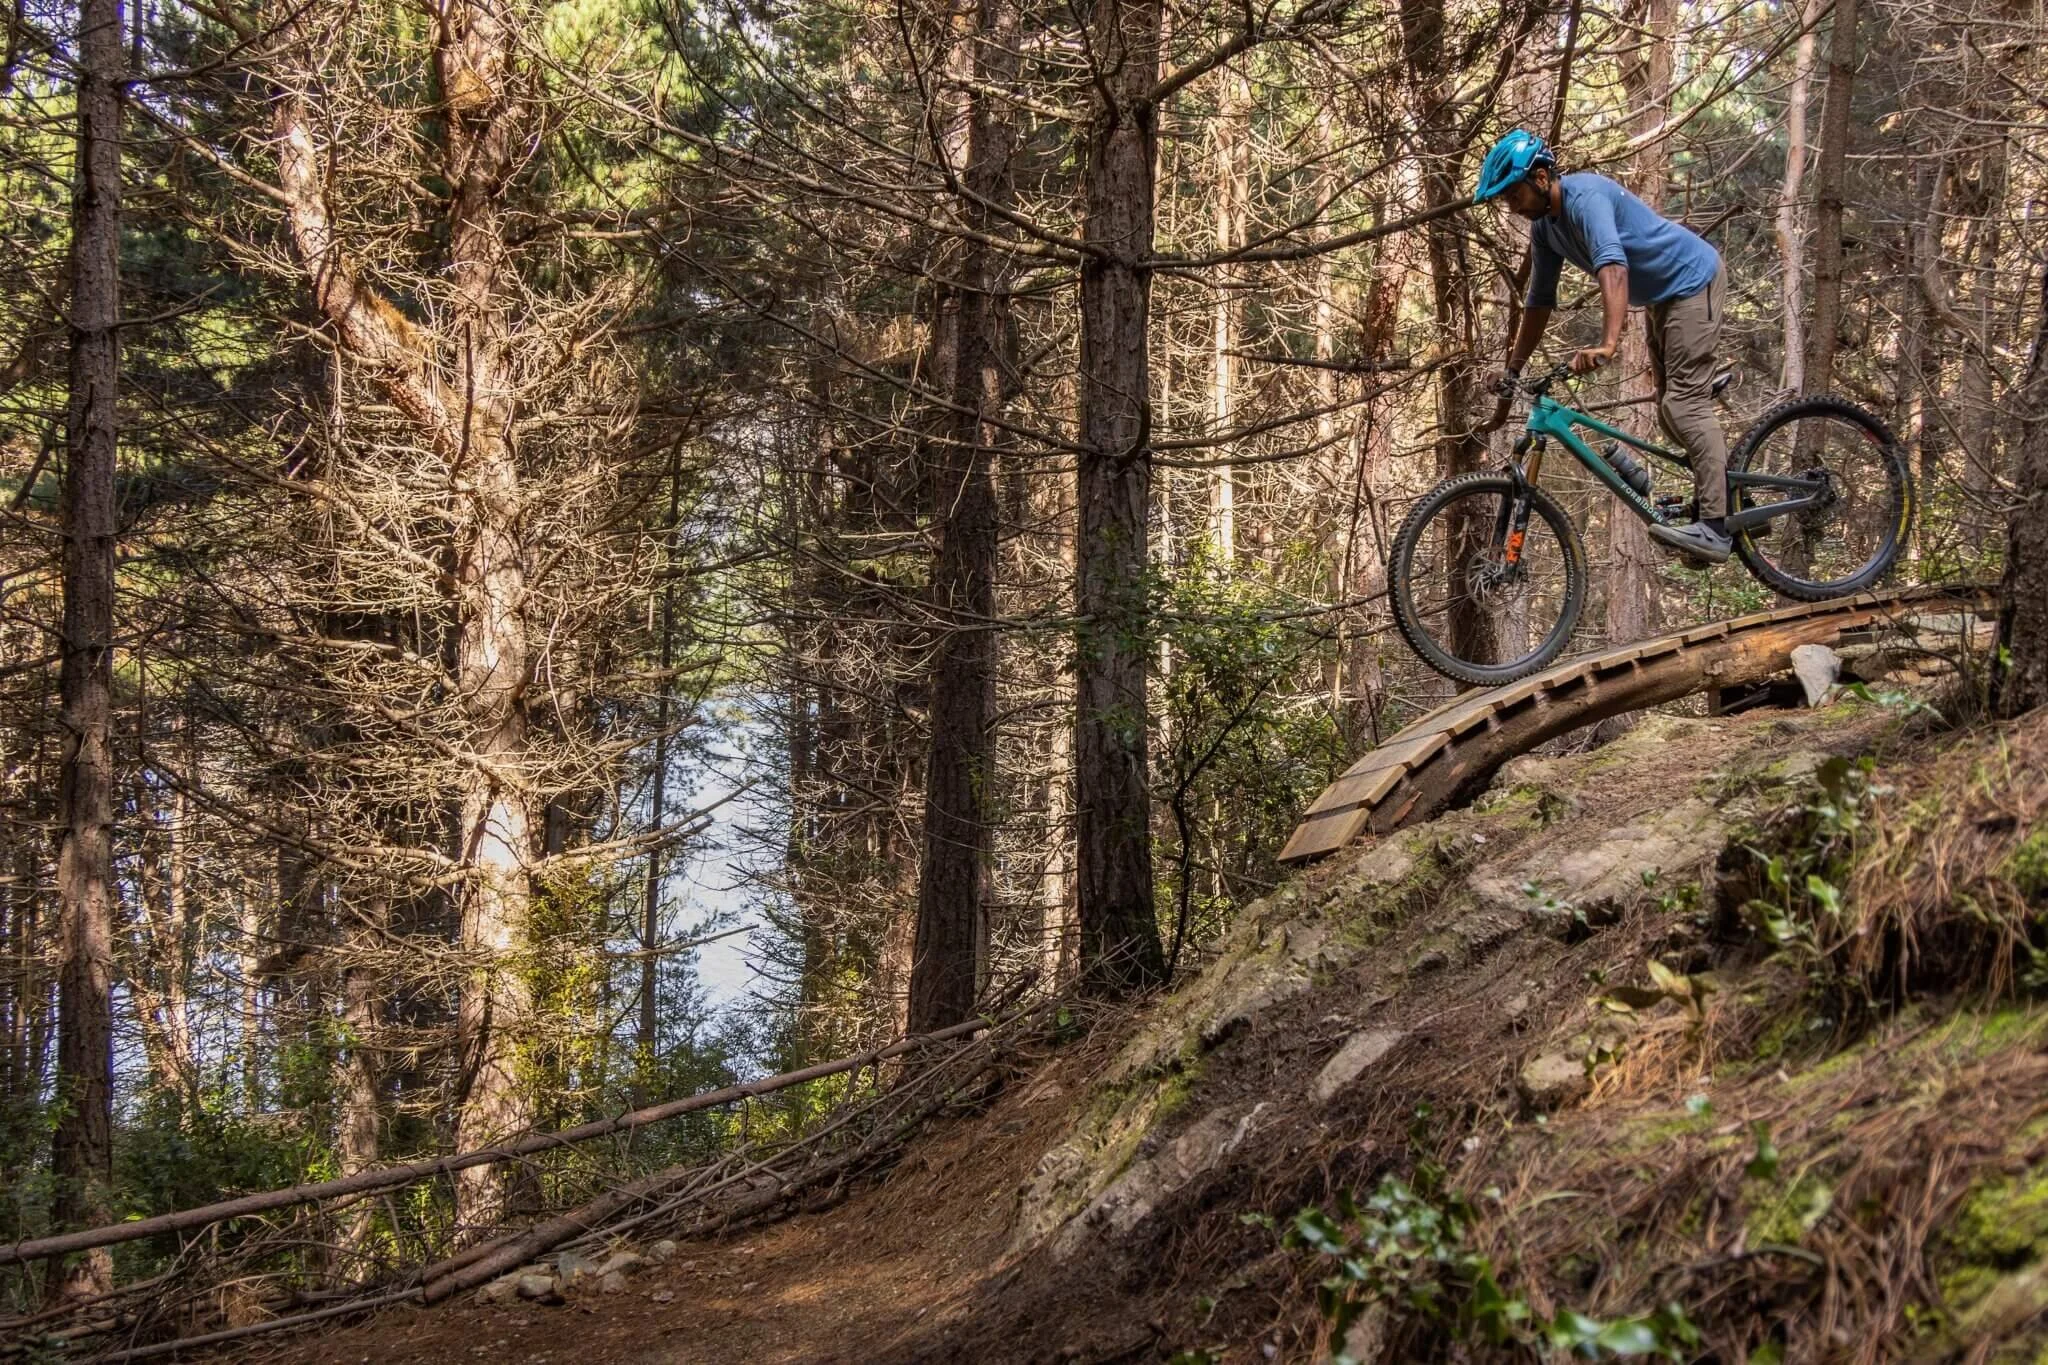
On the feature
As the gradient is about to steepen, absorb the change by moving into a lower, more manoeuvrable position. Stay low until the trail begins to flatten again.
How you move closer to the bike makes the difference. Use an active hip hinge: lower through the hips while keeping your weight travelling through your feet. You are moving lower without losing centredness on the bike.
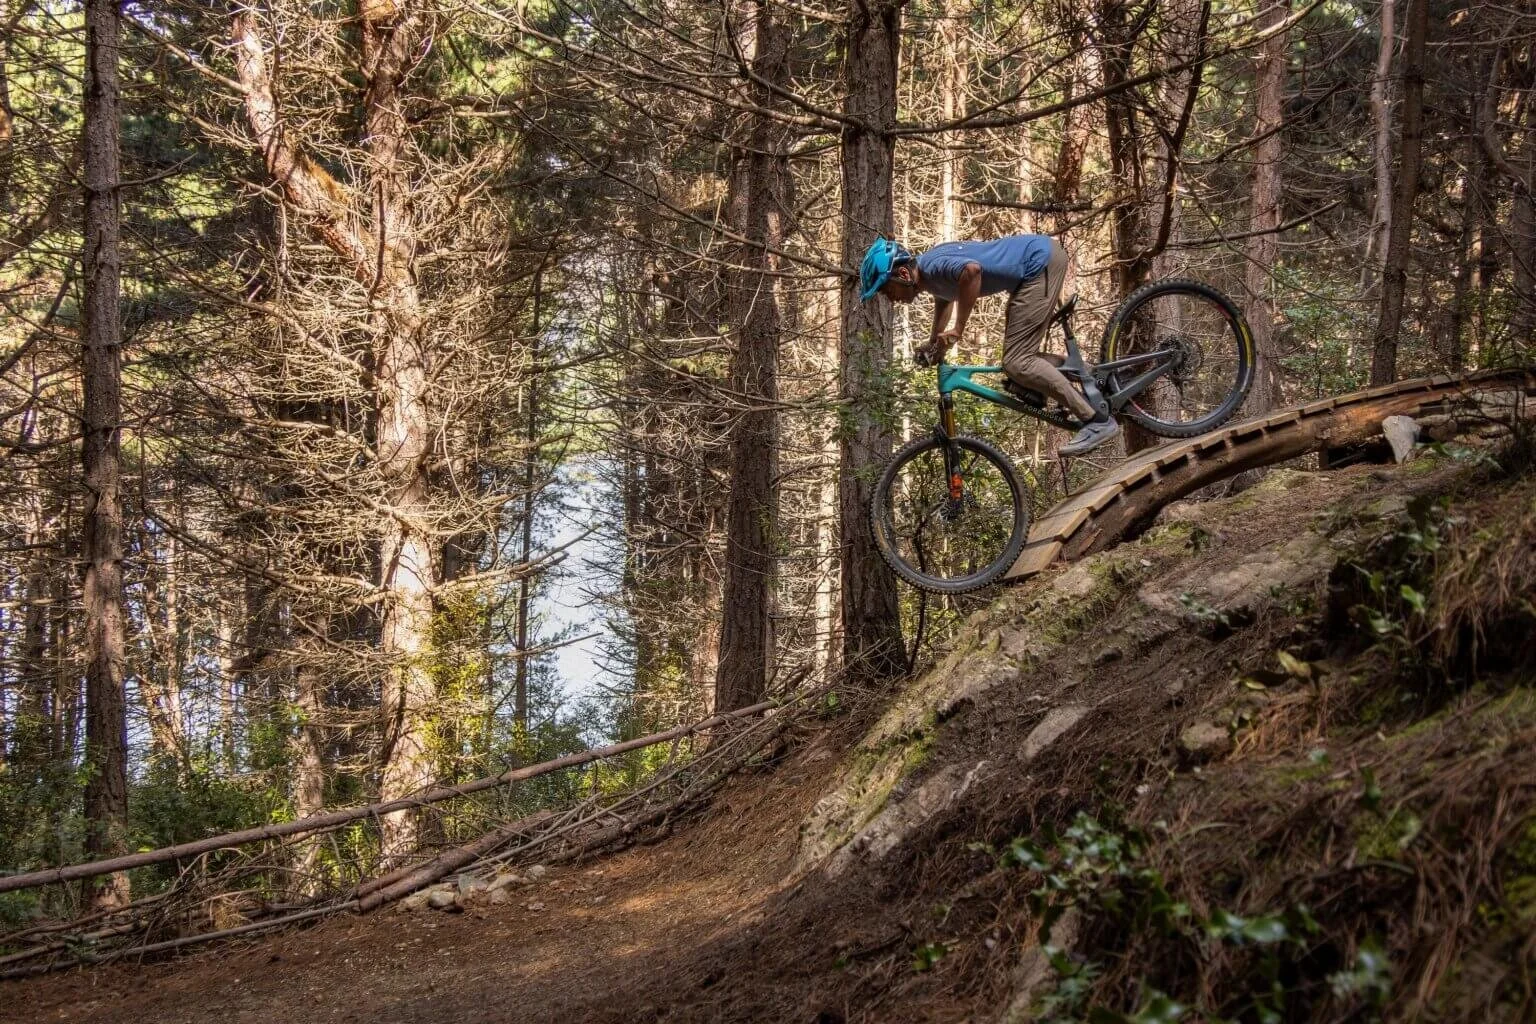
Low position
Stay low and close to the bike. Use an active hip hinge, keep your weight on your feet and hold that manoeuvrable position until the gradient is about to flatten out.
The exit
The change from steep to flat is effectively a compression. As the feature flattens, push through with the arms first, then the legs, using the hip hinge to return to your taller, stronger default position.
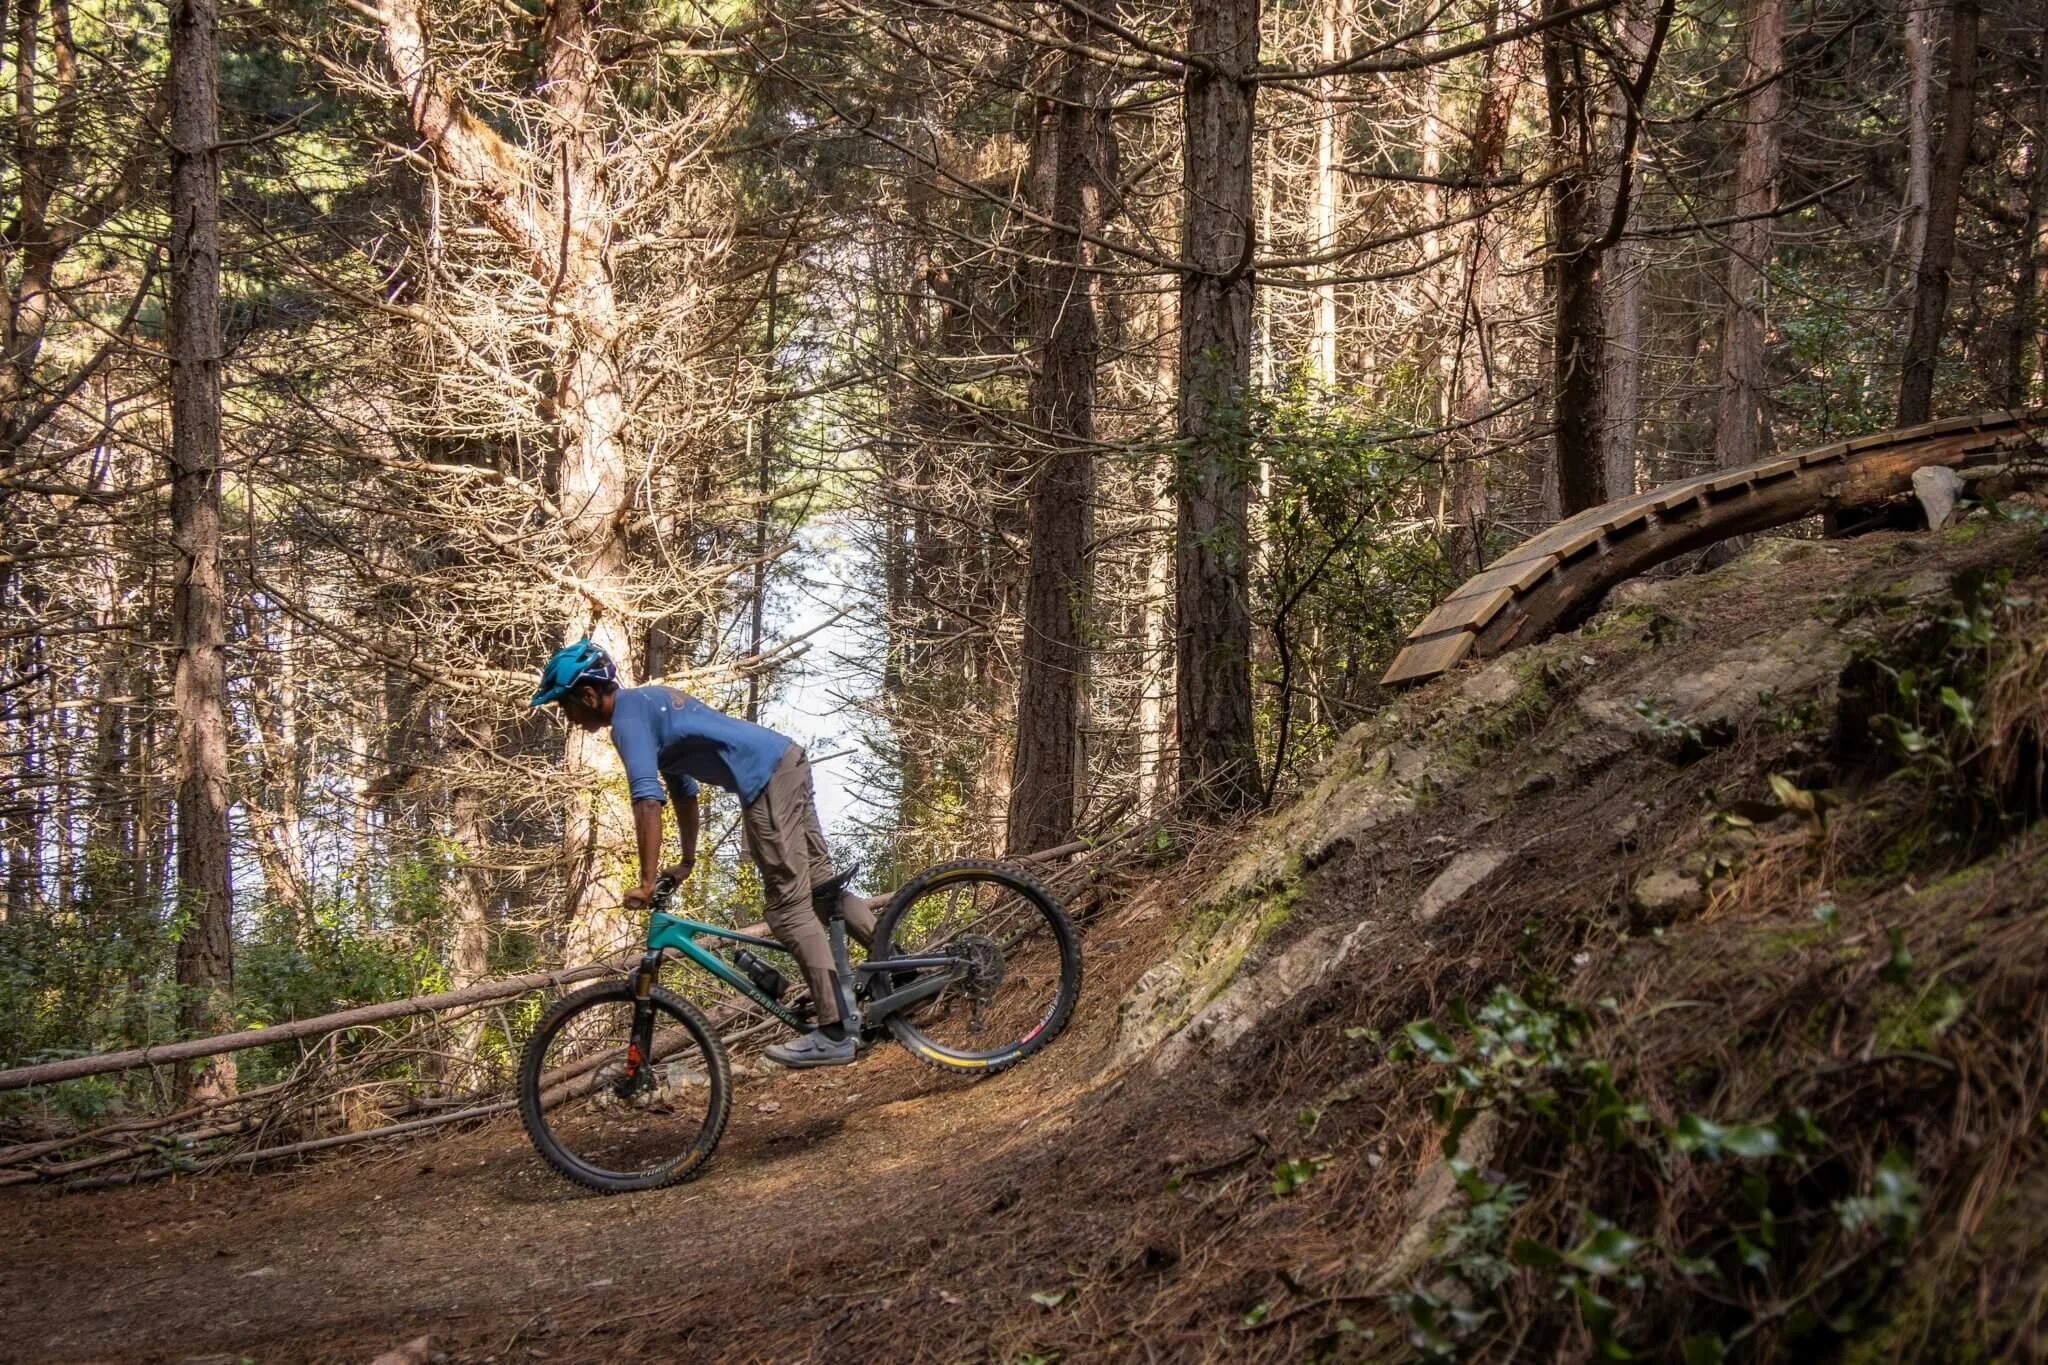
Try the cone crush drill
- 01Mark the exit
Place a cone or draw a marker where the steep section begins to flatten.
- 02Stay low
Remain low and centred throughout the steep section instead of returning tall too early.
- 03Drive through
Crush the marker with the front wheel by deliberately pressing through the arms as you return to the default position.
The drill reinforces staying low for longer and helps time the drive back to a taller, stronger position when the terrain provides support.
Ready to ride steep with confidence?
Join a Treadmark private lesson or skills clinic in Queenstown to build smoother, safer and stronger movement on steep terrain.